Although there are numerous services offering disposable email addresses, it is a tedious process, in most cases, to set them up every time you want a new address to sign up for a service. An alternative to this is to create your own temporary system with Gmail using Google Apps Script, which comes from one of the popular blogs on the internet, labnol. Here’s how to use the script and create a disposable email address with Gmail. To being with, let’s first understand what a disposable email address is, how it works, and also take a look at labnol’s approach with their Google script.
What is a Disposal Email Address (DEA)?
In a nutshell, Disposable Email Address (DEA) is an approach towards preventing the misuse of user’s email addresses and put a stop to phishing emails in their inbox. It employs the use of a single, unique email address to sign up for various services, without requiring the need to input your main email address. Thus, giving you an option to dispose of the email address that could potentially cause email abuse. One of the several advantages of the DEA approach is that, since it employs the use of a single (temporary) email address, there is only one point of failure — meaning, in case you start receiving spams from a particular address, now that you have used a disposable email address, you can easily determine the source of the email and unsubscribe or mark it as spam.
How does labnol’s Google Script work?
Moving right along and talking about the labnol’s approach with a disposable email address, what the service essentially tries to do is leverage the power of Gmail plus trick and Google App Scripts. To do this, it first requires you to set up an email address using Gmail plus tricks, wherein you need to add certain parameters to your email address to create a temporary email address with a validity. After this, the script leverages the power of Gmail API to keep a tab of incoming emails on your temporary inbox. While monitoring, in case the script comes across an incoming email with a future expiry date, it forwards it to your associated (main) email account, else it archives it right away. Although there are various services on the internet that allow you to create a disposable email address, the one we have in this article does not involve any third-party service. Instead, it involves using Gmail (and a Google Script) to offer the same functionality, in a way, taking away the need to grant access to your account to some other application. Now that we have discussed the approach and how it functions, let’s get started with creating a disposable email address using Gmail. The process entails two steps: first, it requires the user to create a disposable email address, and second, it involves a series of steps to create a temporary email system using Google Script.
I. Create a Disposable Email Address (Gmail)
To create a disposable email address, we are going to use the Gmail plus trick. For this, first, go to Gmail and create a temporary, burner account, if you do not have one already. Make sure you remember the credentials for this account. Once done, the next time you visit a website and need to provide your email address, modify the email you just created by appending a plus ‘+‘ symbol followed by a date (in mmddyyyy format). The date you append to your (alias) email address is its validity, after which, the emails sent to this address will be ignored or forwarded to your main email address. For instance, if your temporary email address is xyz@gmail.com, you can modify it to xyz+07142020@gmail.com — which gives it an expiry date of July 14. Using the date attribute, we will then determine similar kinds of emails with the help of Google Scripts in the next step.
II. Set up Temporary Email System (Gmail)
Once you have your temporary email address created, here’s what you need to do.
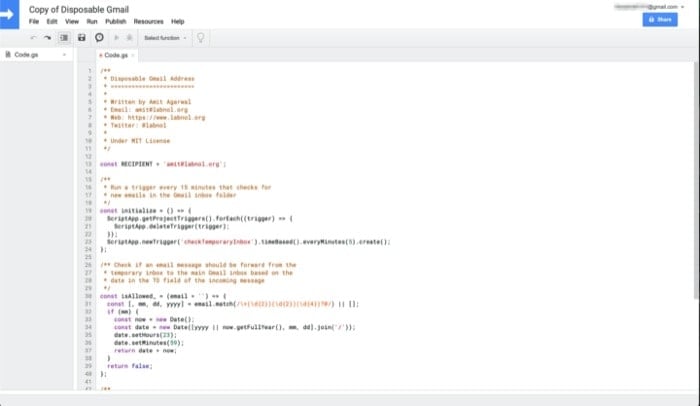
Head over to this link to get a copy of the Google Script to your account. 2. When the script opens in a new tab, go to line 13 that reads “const RECIPIENT” with a value adjacent to it, and replace the email address within the codes with the email address where you want to receive the email from the temporary email you just created.
Next, go to the Run button in the toolbar, select Run function, and hit initialize.
On the next screen, tap on the “Review Permissions” button and grant the script access to your account.
Now, once that’s done, the Script will automatically monitor your inbox for incoming emails every five minutes and sift through them to find the ones with expiry dates in the “To” field. In case it finds one, it forwards it to the email address you added in the Script, else it archives the email. The best thing about the whole approach is that your main email account does not end up on servers of various services you sign up to. Thus, helping you cut down on the unsolicited and spam emails. If you are skeptical about the Google Script, you can head to labnol’s GitHub, here, to check out the source code for yourself.